
Want to take a simple sweatshirt from “I just watched 3 hours of Netflix.” to “This is my street-wear look.” then this lace up sweatshirt DIY is for you!

I bought this blush sweatshirt on Amazon for $8, threw it over my head and proceeded to wear it around the house when I got cold. Since loungewear is so popular these days, I thought to myself, so this counts as fashionable! Though I’m 100% down to get on the sweatpants as a fashion statement thing, I couldn’t help but feel like I looked like I was in my pajamas every time I wore it out of the house. It was a little boxy and didn’t do a whole lot to compliment my figure, so it needed some sort of update.

In order to add a little more sass and a whole lot more fashion to it, I decided it would be really cute to add a lace up detail to my sweatshirt. All you need is a little fabric, a grommet kit (with coupon, always), and a shoelace, bringing the total of this project to about $15, a steal!

Easy Lace Up Sweatshirt DIY
Supplies
Sweatshirt
Cord
10 Grommets + Grommet Tool
Hammer
8″ X 12″ Piece of Fabric
Sewing Machine
Matching Thread
Scissors
Pencil
Time
45 mins
Difficulty
Easy
1. Try on your sweatshirt and mark where you want the V to come down to. Place a mark with a pencil. This will determine how far down the lace up detail will go. Cut a straight line down from the neck of the sweatshirt to the mark you drew with the pencil.

2. Place your fabric scrap on top of the sweatshirt so that it covers the entire cut with about 3″ all the way around. Cut the same slit down the scrap of fabric that you made on the sweatshirt.
3. To connect your lining fabric with the sweatshirt, sew along the V shape about 1/4″ from the edge of the fabric. Then make sure to cut a small slit right at the tip of the V so that you are just about touching the seam.

4. Flip the scrap of fabric to the backside of the sweatshirt and then, again, sew along the V shape, but this time about 2″ away from the edge of the fabric. Trim any excess fabric from the back and at the top of the sweatshirt.
5. To add the grommets, place them along the V shape and mark with the pencil where you want them to go. Make sure they are all evenly spaced and about 1″ away from the edge of the fabric. Cut a very small hole, just big enough to insert the grommets, at each mark.

6. Install your grommets using the grommet tool and a hammer using the instructions on the packaging.
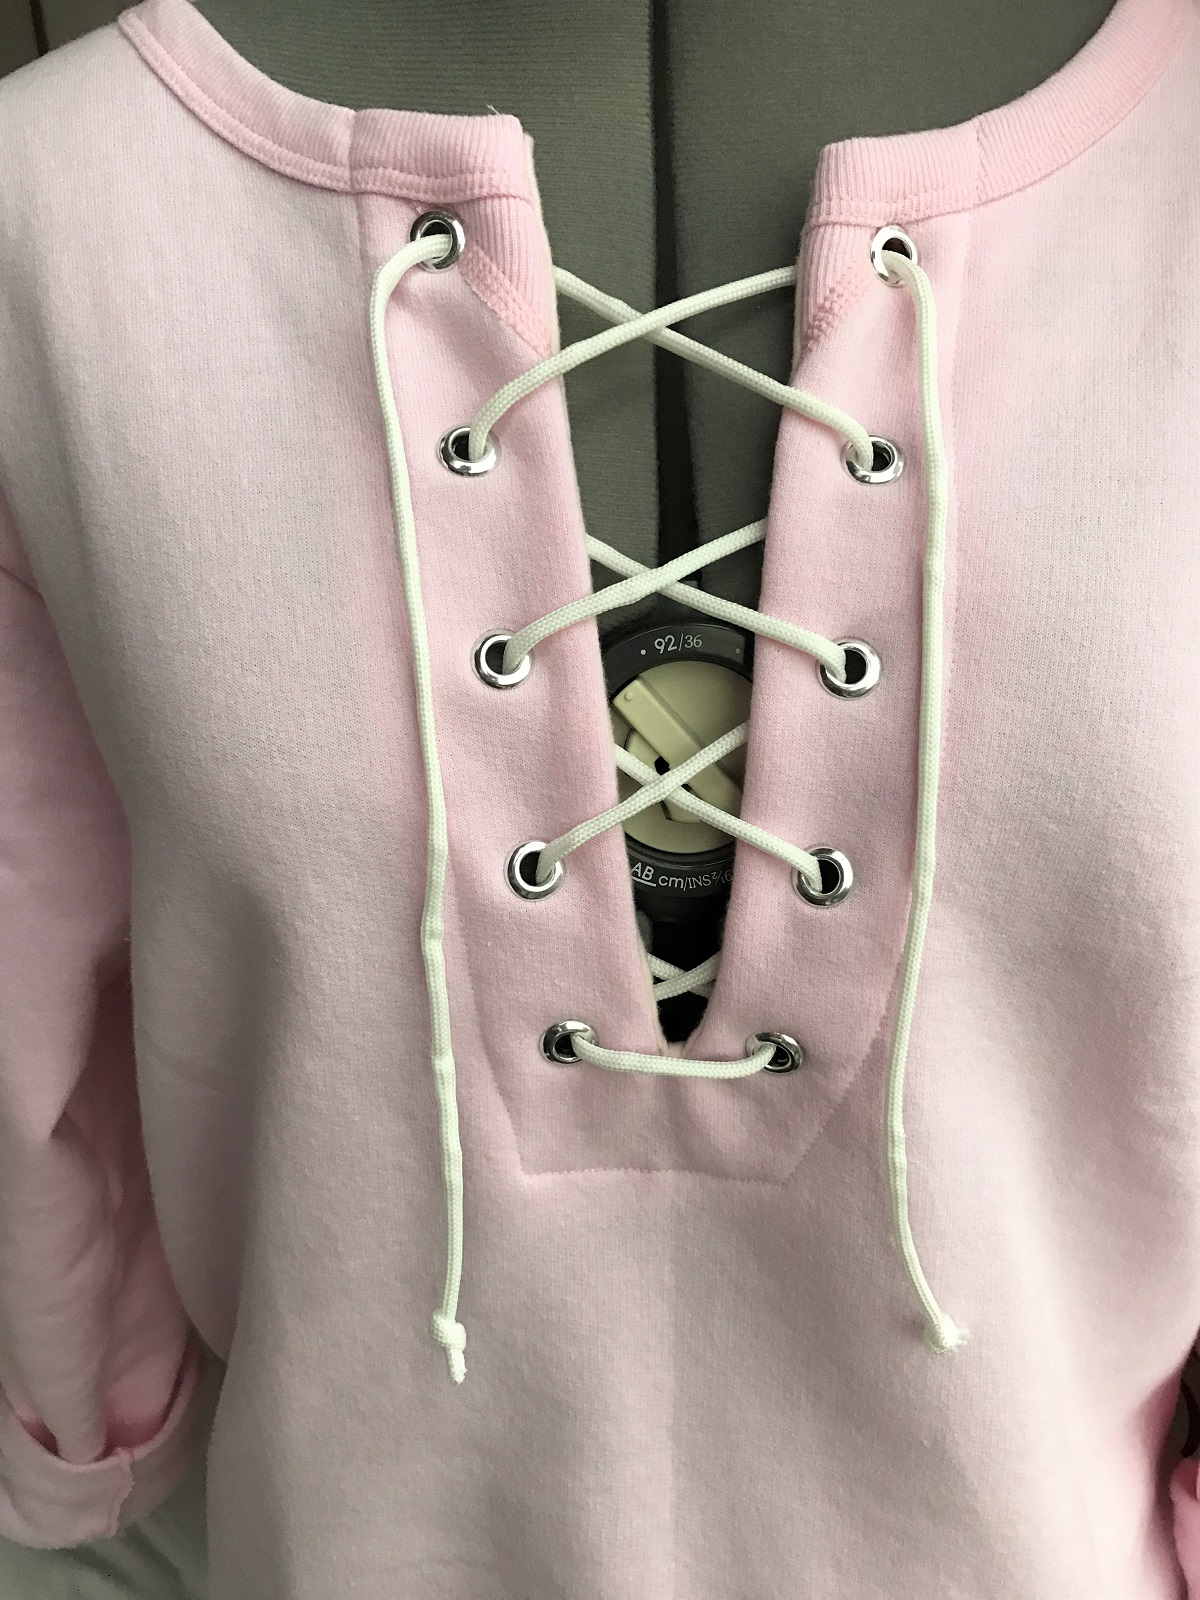
7. Lace up your sweatshirt by stringing both ends of the cord through the front of the sweatshirt on the bottom of the V, and then crisscrossing the pattern as you lace from the back to the front.


Love this. Your tutorial is so easy to follow. Thanks for sharing! I’ve nominated you for the blogger recognition award! I’m always inspired by your blog. You can read more about it here! https://afreshbrewedfaith.com/2017/06/08/blogger-recognition-award-2/ I hope you can participate! 🙂
LikeLiked by 1 person
Aw thank you so so much! I can’t wait to check out the post!
LikeLiked by 1 person
Cute!!! I’ve got a Craft Gossip post scheduled for tomorrow evening that features your tutorial: http://sewing.craftgossip.com/?p=91989 –Anne
LikeLiked by 1 person
Aw thanks so much! Glad you liked it!
LikeLike
omg you’re soooooooooo talentedddddddd i love this!!
Pls check out my outfit & share thoughts too? 🙂
https://thatfirsthello.com/2017/03/05/styling-faux-fur/
LikeLiked by 1 person
Thanks so much! I’ll have to check out your site!
LikeLiked by 1 person
I always have problems putting grommets in. Maybe I should try again. The last time was a number of years ago. Thanks for the inspiration.
LikeLiked by 1 person
Oh no I wonder why, I found the instructions very helpful on the back of the grommet box. Make sure the hole that you cut for the grommet is small enough for the grommet to not slip through but just big enough for the grommet to slide in!
LikeLike
This is gorgeous! It looks so comfy and warm.
LikeLiked by 1 person
Thank you so much Abigail! Glad you liked it! And it’s seriously the best sweatshirt – I’ve been wearing it non-stop!
LikeLike
wow this is so creative! I’ve been loving this lace up style and your diy version looks just as good as the ones sold in stores! I also posted up an outfit on my blog! Stop by and leave me a comment! ❤ http://www.sincerelyaimee.com
LikeLiked by 1 person
I’m so glad you like it! I was really happy with how professional it ended up turning out 😄 and I will definitely check out your site!
LikeLiked by 1 person