
October is here which means it is COSTUME TIME! I actually made this for my Oktoberfest themed birthday party, but it works just as well as a Halloween costume for the upcoming festivities. Really, you can get two events worth of costumes out of this, does it get any better than that?


A dirndl is the traditional outfit that women wear in Germany during Oktoberfest. It consists of a skirt, apron, white peasant top, and a lace up vest. These beautiful outfits are not cheap, however, but there was no way I wasn’t dressing up for a themed occasion. Instead of buying a costume, I decided to make a DIY version for around $30!

I whipped up two skirts for Megan and I during the week before my party. I ended up adding a second layer to the skirt design I had planned to give it a little more volume and character. The apron and peasant shirt were very simple items since the apron is just one piece of floral fabric that is gathered and then sewn to a long, rectangular tie around piece, and the shirt was made with just elastic and a men’s tee shirt! Though the vest looks tricky, I promise it’s not as hard to make as it looks. Grommets, contrary to my belief, are SO EASY to add to a garment. Finishing it off with some frilly lace and colorful ribbons pulls the entire look together and gives it that German charm.
The instructions for every piece are shown below.

For more details on how to make each piece, check out the written tutorial below for my DIY Oktoberfest dirndl costume!
Dirndl Costume DIY
Dirndl Skirt
Supplies:
2 yards Solid Fabric
Matching Thread
1 1/4″ Elastic the width of your waist
Safety Pin
Sewing Machine
Iron
Pins
Scissors
Time:
2-3 hours
Difficulty:
Easy
1. Start by cutting your fabric in half length wise so you have two 2 yard length pieces. Fold one of the rectangles over a little over an 1 1/4″, iron down, and pin. This will be the slot for the elastic. Sew along the two layers of fabric to make the pocket.
2. Place your other piece of fabric on top of the seam you just made on the back side of the skirt and pin it down. Sew this fabric right on top. Now you should have two skirt layers, one that is connected to the waistband pocket and one that peeks out a few inches below.
3. Take your elastic that measures the width of your waist, attach the safety pin to one end, and string it through the pocket made in step 1. Use the safety pin to help you guide the elastic all the way through to the other end of the slot, making sure you have elastic showing on their end. Fold the skirt over so that the elastic ends are touching and the skirt is inside out. Pin the sides of the two layers of skirts together. Sew the elastic closed and then sew the two skirt layers. You will now have a gathered skirt!
4. The last step is to hem the skirt to your desired length by folding over the bottom edge two times and sewing it down. I made sure that mine touched just above my knee on the longest layer.
Dirndl Shirt
Supplies:
1 Men’s White Tee Shirt (go one size up from what you normally buy – I used a medium)
White Thread
1/4″ Elastic the width of your shoulders and arms
Sewing Machine
Pins
Scissors
Time:
1 hour
Difficulty:
Easy
1. Take your shirt and cut it from shoulder to shoulder to remove the neck. Try the shirt on and make sure it is very baggy around your shoulders. If it feels tight at all, take it off and cut the neck to be even larger. You will want the shirt to be big so that when the elastic is added, you get that scrunched effect around your neck and arms.
2. Turn the shirt inside out and fold the neck line down about 1/2″ and pin. Do the same with the sleeves. Sew along the edge of the fabric to make a pocket for the elastic, making sure to leave about 1″ open on the neck and both arms so you have somewhere to insert the elastic.

3. Measure out three pieces of elastic around your shoulders and both arms so that they are all just slightly snug. Take a safety pin and attach it to the end of the neck elastic. String it through the pocket around the neck until you reach the opening again. Pin the two elastic ends together and sew them to secure. Repeat with the arms. You can then close up the holes you left for the elastic or just leave them if they are not noticeable.


Dirndl Apron
Supplies:
1 yard Floral Fabric
Thread to Match
Sewing Machine
Iron
Pins
Scissors
Time:
1 hour
Difficulty:
Easy
1. Take your fabric and cut a 3″ piece all the way along the 1 yard side. If this does not reach around your waist long enough to make a bow, cut another strip and sew the two together.
2. Make the belt portion of the apron by folding the fabric in half the long way and ironing it down. Then fold the ends in once more and iron those down. Pin the entire belt and sew along the open edge.
3. To make the skirt, cut a piece of fabric 18″ x 36″ large and sew a seam along the 36″ side without back stitching at the start or finish of the seam. Pull on the threads and scrunch your fabric so that it is about half the width that it started at.
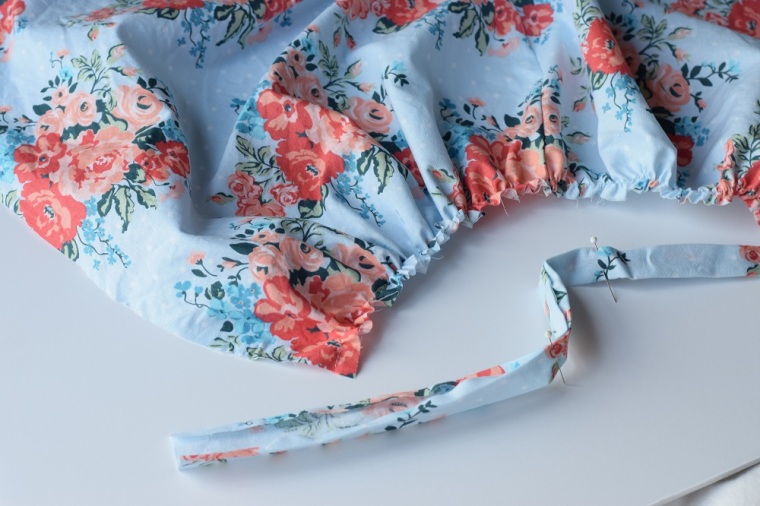
4. Line up the rouged side of the fabric in the center of the belt and sew it down over the same seam as before. Complete the apron by hemming the sides and bottom of the apron by folding them over twice and sewing along the folds.

Dirndl Vest
Supplies:
1/2 yard gray felt
Gray or white thread
Sewing Machine
Lace Trim
10 medium, silver grommets with grommet tool included
Hammer
2 yards Pink Ribbon
Pins
Scissors
Time:
2-3 hours
Difficulty:
Medium
1. To make the vest, fold your fabric in half and cut out one BACK piece (along the fold) and two FRONT pieces (see the instructions for sizing).
2. Lay your FRONT pieces on top of your BACK, lining up the shoulders and the sides. Sew a straight stitch along all four spots, about 1/4″ from the edge of the fabric. Try on your vest. In order to gain enough space between the two front panels for the lace up pattern (about 3-4″), and to make the vest more slimming, you will want to add darts to the back that are about 1″ wide at the base and taper down about 3/4 of the way up.

3. Flip the vest right side out. Mark dots every 2″ along the FRONT panels about 3/4″ from the edge of the fabric. This will be where your grommets will go. Cut out small holes the size of your grommets, and then hammer the grommet pieces together per the instructions on the packaging.
4. The finishing touch is to lace up your vest from the top to the bottom, and add on any trims you would like. I added two pieces of lace that were about 11″ long to the front by simply sewing them directly to the front of the fabric.


I am sorry, but this has got nothing to do with a traditional German Dirndl. It‘s easy to sew and nice for a Halloween Party. If you like to sew a real Dirndl, you should follow some of the Pinterest tutorials. It‘s a lot of work and requires sewing experience.
LikeLike
Hi! This is adorable! I’m going to attempt to try it. Can you help clarify how you get the measurements for the vest width for back and front? Is the entire back measurement your waist divided by 4, then add 2, or just the one half of it? And then front it says 9″. Sorry if I sound confused! Thanks so much!
LikeLiked by 1 person
Hi Andrea! I’m so glad you are going to try it out! The entire back is your waist divided by 2 plus 4”. I have the fabric shown as folded on that edge! Each front piece is 9” wide and you will have 2 of them. To be safe, I would just say to make the width of the front 1/3 of your waist measurement. Hope this helps!
LikeLike
I am a plus size. can you tell me what size this pattern is?
LikeLiked by 1 person
Hi Mary! This pattern the way I wrote it is in a size 6, but you can easily change it for a different size! The skirt width is listed as 2 yards which is a little over 2x my waist measurement, so if you multiply your waist measurement by 2 you should be able to adjust that. The apron is 1 yard which is a little more than my waist measurement, so you could do the same thing. For the shirt, I just used any oversized tee shirt I had where the arms were a little big, so I would think you could probably find that as well. The vest measurements are listed with calculations for the back based on your measurements. I would probably adjust the front measurement as well as it is just your waist measurement divided by 4. Hope this helps!
LikeLike
Julia, thank you so much. I will be a part of the parade this year. K9 campers, a dog daycare, that my service dog, Miki Roonie, goes to is a part of the parade this year. I have Miki’s costume figured out & now with your help I will have mine done. Next we need to figure out how to decorate my wheelchair. I am really looking forward to this with Miki. He loves to wear clothes & I think he will look so cute as long as I get his clothes right. He is a 11 pound Yorkie. Thank you, thank you so much,
Mary Hurt
LikeLiked by 1 person
That sounds adorable! I love dog costume contests. My parents dressed their Boston terrier as an ATAT from Star Wars last year and it was so cute!
LikeLike
I had to reblog your post so I will remember it, I hope you don’t mind. What a great idea I may have a Oktoberfest Themed Party as well.
LikeLiked by 1 person
No problem! I’m so glad you liked the tutorial! And it’s a great party theme, people are always just excited to have fun and let loose!
LikeLike
Reblogged this on My Favorite Recipes and commented:
A great project for this Year’s October Fest
LikeLike